Tuesday, December 13, 2016

Use one lookup table as base for all the LOV's

One lookup table as base for all the LOV's

Lists of Values ... it's probably one of the most often used components in APEX development. And actually in any kind of software development, I suppose.

Having an E-Business Suite background, I got the idea to steal one of the better ideas the EBS has and that's dealing with LOV's, "lookups" they're called.
All those lookups are based in one single table, operating over a lookup-type. In EBS a set of views is defined and those views are used depending on the EBS domain.
I choose not to go that far and kept it to one single table.

A second idea stolen from EBS is the dependancy between lookups. Also that idea I simplified a bit and I kept it to one level. Meaning a set of values can differ from the chosen value of another set.

Finally I used the idea behind the multi-lingual solution of the EBS. Though that is the one I simplified the most. Whereas in EBS you have a base table containing a code and an _TL table containing one line for each installed language, in this solution I simply maintain all languages in the same base table. All records have a language code and in most systems there are two, max three different languages.

Table structure


Let me run you first through some background info. This solution was built for an extension on the EBS, in the HR modules. But the customer has a whole different database setup for the APEX extensions, so we're not directly using the EBS itself. A daily routine copies some basic EBS data over to the "APEX db" using a database link.  The solution itself and the architecture has pro's and con's, but I'm not writing about that now, let's keep focus on the LOV's.

EBS uses a lot of LOV's and of course we want to offer the user the exact same LOV's in the APEX applications.
So the table EBS_GENERIC_LOVS was created.
  • LOV_TYPE: As explained in the introduction, the column LOV_TYPE refers to the type of LOV in EBS. It's basically the grouping name of the LOV;
  • LOV_CODE: that's the code used for the value itself. A code is unique within a type;
  • MEANING: is in fact the display value that goes with the LOV_CODE;
  • DEPENDANT_LOVE_TYPE and DEPENDANT_LOVE_CODE: it's the DEPENDANT combination of type and code. This links the value with a value chosen in another LOV. This LOV must of course exist and on the APEX page it must be entered before this LOV;
  • ACTIVE_FLAG, VALID_FROM and VALID_TO: the combination of these columns make the value available or not in the LOV;
  • LANGUAGE: a two-letter code for the language, depending on the language chosen in the application, it will show the correct value of the LOV;
  • SEQUENCE: an optional way to fix the ordering sequence in the LOV.

Language option

In case you're not familiar with EBS and how languages are being used up there: EBS is always installed in English (code 'US'). Optionally one or more other languages are installed, e.g. Dutch (code 'NL'). It's just a side note, because it has nothing to do with the solution itself. But it explains why screenshots show weird data :-)

When a user logs on to the EBS, a language is picked. That displays all the screens in that language. Also the data seeded by Oracle will be shown in the correct language.
But when you enter data, let's say the names of all the departments of your organisation, you initially enter that in one language. As Oracle can't translate that (yet???) in the other languages by itself, by default the entered value gets copied over to all different languages installed. And the user is responsible to and translate the values manually.
An example makes it more clear:

Two languages are installed: US and NL. A person that sets up the different departments is logged on in Dutch (code NL).
This person enters "Verkoop" as name of the sales department. When the SAVE button is pressed, two records are being saved in the _TL table for departments:
  1. Name: 'Verkoop' - Language: 'NL'
  2. Name: 'Verkoop' - Language: 'US'
Now it's up to this person doing setup to go and change the second line to:
  • Name: 'Sales' - Language: 'US'
If this step is not performed, every place where the department name is shown, regardless what language is chosen at login, the name 'Verkoop' will popup.

Dependant lists of values

This is exactly the same as what is done in APEX via Cascading LOV's. But here the link exists already in the table.
En example: the salary of an employee is identified by the grade that is defined for the employee. Each grade is split up in different steps (spinal points). The combination of a grade and a step (on a specific moment in time) define the salary.
This means the step (which is referred to as spinal point in the EBS) is dependant on the grade.
So every LOV_CODE of the type 'PER_SPINAL_POINT' will contain 'PER_GRADES' as dependant_lov_type and a specific value in dependant_lov_code. And that code of course must be a valid code for the type 'PER_GRADES'.
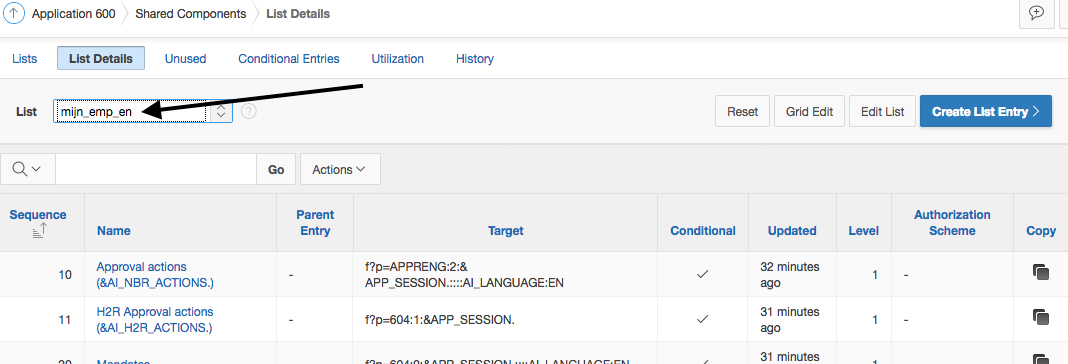
The LOV in APEX

In APEX you still need to define the LOV's that belong to the specific page items.
But this is where you gain from this solution. Because all your LOV's will look the same. It's a simple query every time on the same table:


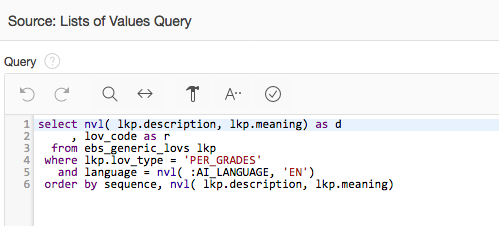
As you can imagine, the language is stored in the application item AI_LANGUAGE.
The columns description and meaning are often mixed in EBS, hence the NVL.

On every LOV_TYPE you can make an APEX LOV with this same query as base. The only thing different will be the where clause "lkp.lov_type = ".

The dependant LOV identifying the step will then look like this:


The result in APEX


You notice that although the application language is English, the content - in this example the names of the grades - is in Dutch. This is - as explained above - because in EBS the (manual) translation of the setup of the grades from Dutch to English was never done!

Because Step is depending (cascading) on the Grade, no value can be selected as long as the Grade hasn't been entered:


Once a grade is chosen, the dependant values in Step appear:


My conclusion

This solutions requires hardly no extra effort compared to the standard way of working.
I would say even less effort is required.
On top of that it is absolutely no stopper of any existing LOV already in the system.

But most important advantage: I described the link with EBS, but in general it can be used for any system you link with: exactly the same LOV's on the base system can be re-used in the APEX application.

It should be clear that everything described above can also be done via normal LOV behaviour in APEX. But I truly believe that you will limit maintenance cost dramatically by using one single base table for all the LOV's!


Happy to share ....


Tuesday, December 6, 2016

Using JSON and Javascript to show or hide list menu entries

Using JSON and Javascript to show or hide list menu entries 

Here's a post that is the result of great team work. Proving once again a point that I believe in very strongly: so few great ideas come from the hand of just one person!

A colleague and I started brainstorming on this for a very specific need for a very specific customer. But our solution is really very flexible and re-usable for many other things! Read on, believe me, it get's interesting! ;-)

The technology

We're gonna use PL/SQL (of course), Javascript, APEX API's and a JSON structure.

What's our goal

We were looking for a flexible way to show or hide menu list entries. 

You see we have a dashboard alike application that does nothing else than kicking off other APEX applications. The complete set of applications is kind of a "Suite".
Now depending on which role you have in the organization you can see different list entries.
All very much feasible with the normal conditions of course.

But this "Suite" is growing and with the team working hard, a lot of applications are being build as others are ready to go in the Test or Acceptance cycle, others are ready for Production. But others are still "under construction" and aren't allowed to be installed in other environments.

The solution in words

So we wanted to have this double validation in a flexible way. The information - or setup if you want - needed to stay in the APEX application. We wanted to avoid storing it in a custom table, because then we would have the extra difficulty to maintain this "setup table" on al the different environments.

So we had a good close look at the application.
We also had a good close look at the List Entry screen in APEX and finally we browsed through the APEX API's.

The solution in technology

Administrator stuff

All the following points are to be done once, by an administrator. So of course, that part of the APEX application Suite is protected and only administrators can do it!


We're using a table to store the environment information. This will be a pretty stable situation.
In my neck of the woods, we often talk about the "OTAP" street. In the English speaking world, I think only the "O" needs explanation. 
The "O" stands for "Ontwikkeling", which is Dutch for "Developtment".
"T" = "Test";
"A" = "Acceptance";
"P" = "Production".

Our table looks like:


And a really simple APEX page to handle this setup information:


Then it gets a little more complicated. Or is that the wrong word? It should probably sound nicer when I say "interesting" ...

This overview page shows all the lists that we have identified:


And this information is fetched from the APEX repository. Have a look at the query behind the scenes.

We're gathering all the lists on the pages we've identified in the different applications.


And here it's important to picture that each and every menu groups some (Self Service) tasks to which you either have access to or you don't ...

Let's take a closer look at one single Menu, the one for "My Employees".
This is typically a menu that only is visible for managers ....


And now we land in a page that needs some explanation, I believe:


It's probably (hopefully) still clear that this is an overview of all the list entries of that List called "mijn_emp_en".
So we show the list entry name. Followed by the check icon if there is an APEX condition entered for that entry. In our example almost all entries have a condition.

Next are the four environments: O - T - A - P. It's simple enough: 'Yes' means that the list entry is to be displayed. Or in other words: this functionality is installed in that environment.
Because it's not sure yet it can be displayed according to the rules of role management!
That's the last column: "Enabled for these role codes".

Our roles are coded in a table as well. E.g. 'ADM' for 'Administrator' and 'DIR' for 'Director' ....

If you have a look at the screenshot above, you see e.g. that the functionality 'Leave cards' is only available on Development ('O'). And (e.g.) the 'Team occupation overview' is also available on 'T'. Nothing has been installed on 'A' or 'P' yet.
And all entries are allowed for that set of roles identiefied in the last column.


Now it's time to zoom in on one entry. And in the screenshot I changed the list of roles, to make it more clear:


First the condition in APEX is shown. Because this condition will also be checked upon. But in our exercise it was the idea to replace those conditions by this flexible mechanism.
We then chose the environments where the application can be used (remember - almost - every list entry navigates to another APEX application).

The functionality may not be shown for the roles 'CTRL' and 'EMP'. All other roles will be able to access it.


Behind the scenes, beyong the obvious

I told you, we're not storing the setup in a table, but directly in the APEX application.
The Apply changes button kicks off the process 'Save values for Envs and Roles'.
Here the two types of validations are seperated. Because we store them in the attribute values of the entry itself. 

This code was a bit of work. Figuring it all out. Therefor step by step:
  1. Gather all current values.
    A very important step, because we learned the API overwrites everything with null values if you pass nothing.
  2. A JSON structure is used.
    Simple: we needed "a" structure and we believe that JSON was the best way.
    One JSON for ENTRY_ATTRIBUTE_09 to store the environment Yes/No information.
    Another JSON for ENTRY_ATTRIBUTE10 to store the role code information.
    Here we used the apex_json package.
  3. Now we need to set the API mode to 'REPLACE'.
    To make sure we can put the mode back to the original value, first the original value is stored:
    l_old_api_mode := wwv_flow_api.g_mode;
    wwv_flow_api.g_mode := 'REPLACE';
  4. Next the API. It's is called: wwv_flow_api.create_list_entry
    See screenshot below, where most important parameters are highlighted.
  5. Set API mode back to it's original, which is reversing what we did in step 3.


Results in the List in APEX

To see the results, have a look at the Shared Component List


And we pick the "Team occupation overview"


And just to show the condition, always returning "false", obviously a test case ...


But the real interesting stuff is in the attributes:


Now this information is in this application's definition. And it can be moved to any other environment. It's not important that the functionality behind this list entry is in fact installed on that environment. Because it will only come into play when the environment specific setting is set to 'Yes'.


And at run time

Now we have all the setup available. We have all the information in place to decide what to display for whom and what not to display at all.

So let me first show two screenshots of the same application.
First one is the application seen by the eyes of an administrator (remember the 'ADM' as role).
Second one is by the eyes of a supervisor (remember the 'SV' as role).

Administrator


Supervisor


To make this happen, we needed a Post-Rendering process on the page showing all the List regions:


It looks like a very simple process. But the complexity is hidden in the PL/SQL:


The PL/SQL code is too large to display here, but upon request (I guess) we're willing to share also that. However in short, this is what it does:


  1. Initialise some code:
  2. Check the DB we're living on:
  3. Loop through all regions, as some lists are defined in different applications, the query got quite large, but we're joining apex_application_page_regions and apex_application_list_entries
  4. Read both JSONs and look for the corresponding Y/N values
  5. We then check if we're at the end of a list, because if a list is completely empty, we also remove the region so you don't get a list region with no list entries in it!
  6. Check on the environment, because when the environment says no, we don't need to check the role condition, do we?
  7. Same check for the role
  8. Construct the javascript to remove the disabled list entries

Now, all this is executed as a JAVA script after having rendered the page. This means that an APEX condition is on a higher level than this validation. Meaning that if the APEX condition e.g. says 'Never' ... it really will be 'Never' and it will not display, no matter what comes out this Post-Rendering process.


Here we are ... a long explanation, I know. I tried several times to make it shorter, but then I believe the it was not possible to follow the route anymore. Well, I hope now it was possible to follow what we did. If it wasn't and you want to know more, I'm sure you'll find a way to get in thouch with me.

Also I want to thank again my colleague and partner in crime, Joost, for making this all possible!

Remarkable final thouch: we have some pretty good DJ's in Belgium: thanks Regi and Dimitri Vegas & Like Mike for the inspiring music while writing this all down .....


Happy to share ...