Tuesday, May 9, 2017

Region display selector

How to use the Region Display Selector

in my previous blog post on Sticking Information to the top of the page I mentioned the Region Display Selector, but I thought in fact it may also be good to explain that a bit further as well.

This mechanism is used in the APEX Builder all over the place.
I'm working here in APEX 5.1.1 ...

Example in APEX Builder

This mechanism is used all over the place in the builder, but one example is the Security Attributes in Shared Components.
When "Show All" is selected, you can see all the tab pages. And when you scroll down, you'll notice the region indicator stays in its place and a visualisation effect shows you where you are while scrolling.


When you select one of the tab pages, only that specific region will be shown? In the example below the Session Management tab is selected.


This exact same mechanism I want to be able to use in my own applications ...

Example

A very quick example: a (for now) two pages application: the Home page (which is empty) and the Region Display Indicator page. I'll walk through it while creating the page.

Starting point

I used the wizard to create the application in its most simple way: application with home page!

I added the page (2) Region Display Selector as an empty page:


On Page 2 I've then created two regions in the Content Body:


This is the result for now:


Creating the Region Display Selector region

Simply create a new region of type Region Display Selector.

You now already have all building blocks in place. 
But I hope you agree with me that it's not yet the correct layout:

But it does already work. In the screenshot above the "Show all" is selected and yes, both regions are shown.
But when you e.g. select "Sub Region2", you'll notice "Sub Region 1" is no longer displayed.


Now I want the Selector region on top of both sub regions and I want to hide the title.

Moving it up the page is easy. Simply drag and drop the region where you want to have it.

In the attributes pane for the Selector region, you can edit the Template Options:

Set the header to Hidden and optionally also set style to Remove UI Decoration:


This results in:


And I believe this does the trick.
If you want the Selector to stick to the page, you can move it into the Breadcrumb Bar.
Or have a look at my previous blogpost ;-)

Happy to share


Fix items and buttons on top of your page

Fix items and buttons on top of your page

A requirement that regularly crossed my path and I didn't know of a standard way of doing it: on the top of a detail page some basic information is repeated and the page buttons are to be displayed at the same place. And more importantly: they must stick to that place while you scroll down to the bottom of the page.

In this example I'm working on APEX 5.1.

Example

We're dealing with a form on a table with report (IR).
The Interactive Report (IR) shows the name of an employee and some other general info. When you navigate to the detail page, the name must be repeated at the top of the page.
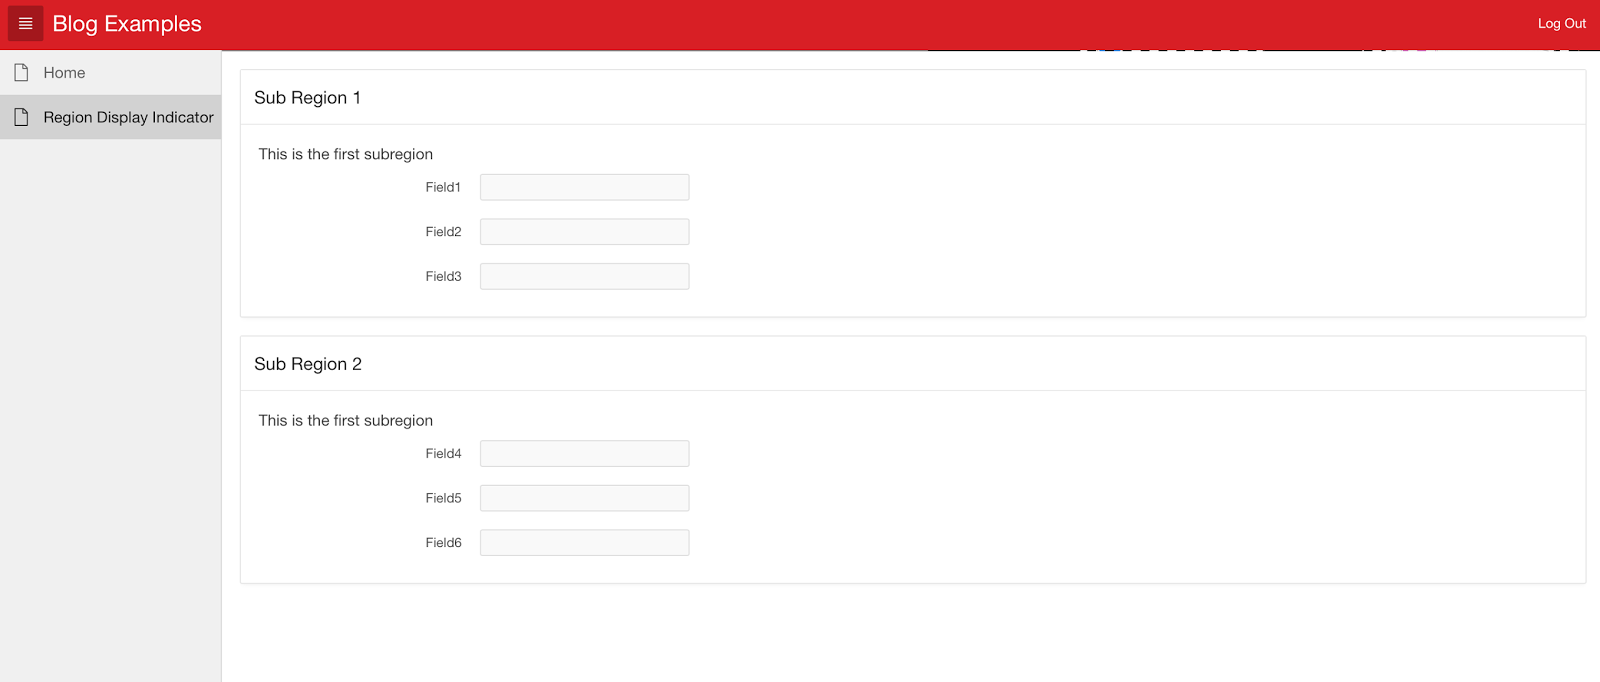
All input fields (there are a lot of them) are in a second region.

We worked with a Region Display Indicator to keep on overview on the page. But couldn't find a way to keep that region display indicator sticking to the top of the page while scrolling down. Though in the APEX Builder this technique is used, somehow.

There are some reasons why I decided to dig into this one today:
  1. it's a logical request
  2. if I would manage to get this repeating information sticking to the page, I could use the same technique to stick the page buttons to the top of the page
  3. when it's done in the APEX Builder, it must be possible in my own APEX applications as well
So I started the research and asked my good friend, Mr. Google.
And it has been done before by several other people. I gathered some information here and there and made a solution that fits my needs by combining all the pieces.

Small introduction

First this: I'm using screenshots of an application we're building for a customer. It's an application that supports the hiring process of new employees. And I must stress the fact that the use-case, all names, characters, and incidents portrayed in this example are fictitious. No identification with actual persons (living or deceased), places, buildings, and products is intended or should be inferred.

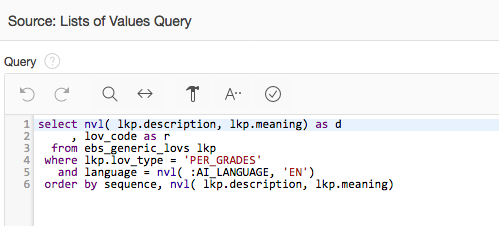
For the screenshots I'm using the English version of the application. However, you'll notice that some of the lists of values are in Dutch simply because they are not translated in the base system of the customer.

The result

Here's what I was going for in a few screenshots.

The Overview page with general information is an Interactive Report.


To see (and possibly edit) the details, the first row has been selected. This is the page how it's shown on page load:


And when you scroll down, you'll notice the title "Candidate ..." and the buttons "Overview", "Apply Changes" and "Submit" always stick to the top of the page.


Step-by-step explained

The two pages have been generated by the wizard Form on a table with report. All data (except for the address information and the attachments) is stored in one large table, which makes it easy when using the Automatic Row Fetch and Automatic Row Processing.

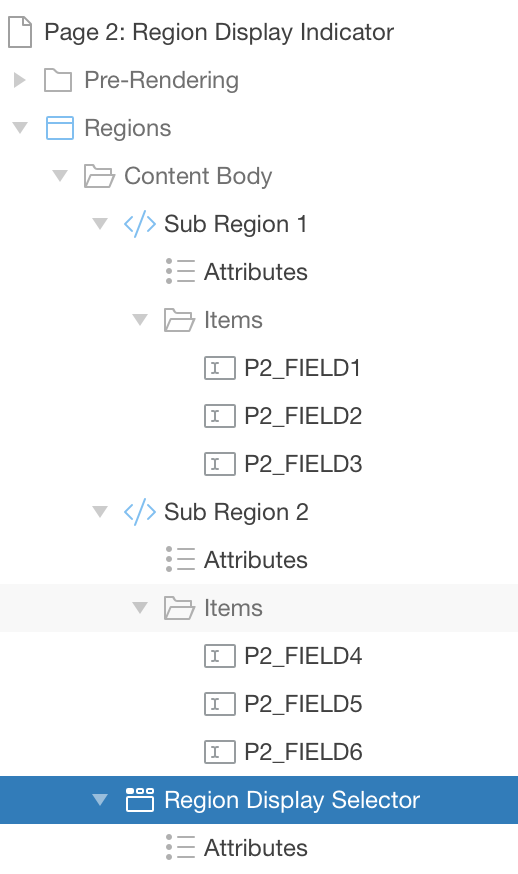
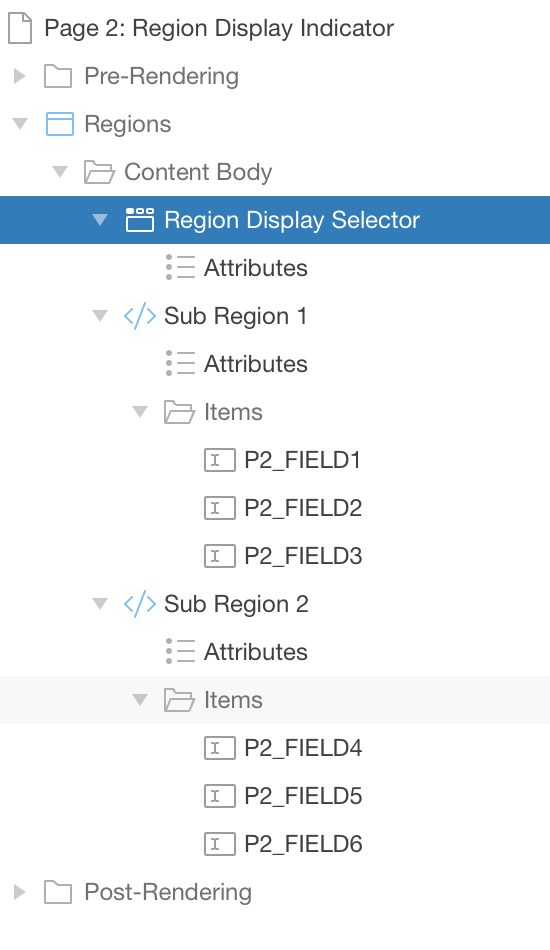
All page items are placed in some regions, to logically structure the page. And by using the Region Display Indicator it's easy to navigate through all fields without having to scroll down like an idiot all the time.

So when you do nothing, all the regions are placed in the Content Body of the page.


In this example the breadcrumbs were defined on P0, but no longer used. That's why you notice the "Breadcrumbs (Global Page)". As explained they are not used and conditionally set to never. That's not part of this solution, in fact has nothing to do with it, but in case you were wondering why the breadcrumbs entry is still there, you can stop wondering.

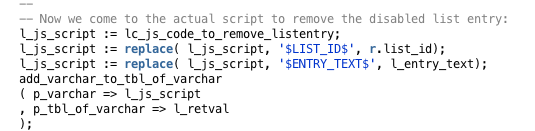
I want to repeat only a minimal amount of data. In fact in this case only the name of the candidate is sufficient. So I opted to create a hidden page item that composes a so called full name of the candidate. This page item is part of the region that displays the region selector.

On my first attempt the item was displayed in that region. But it takes away unnecessary space on the page. So I decided to hide the item and incorporate it in the the title by referencing the page item &P9_FULL_NAME. which will probably never win the price for Most cool and inventive solution, but it does the job.


Region Candidate: &P9_FULL_NAME.

I have moved the region outside the Content Body of the page into the Breadcrumb Bar. When this Breadcrumb Bar is not visible in the rendering pane of the Application Builder, you can always use the Grid Layout and drag and drop the region into the correct spot.


Along with some other hidden page items, you'll notice that P9_FULL_NAME is also a page item in this region. The buttons (Cancel, Delete, Save, Orca and Create) are defined in this region as well.


The buttons are all displayed in the Edit locator, to keep them next to the region title and aligned to the right.


And page item P9_FULL_NAME is set in the Pre-Rendering page load process Get Full Name of candidate. For now it's a simple concatenation of the first-name, prefix and brith-name of the candidate.
When referencing this in the region title, it's important that the process is an After Header process. Don't forget the "&" before and the "." after the referencing!


The Candidate region is in fact the region display selector. Traditionally you would also name it that way and then hide the title via the Template Options. But in this case I simply added the variable information in the region title.


Now we should have all in place to have this region in the Breadcrumb Bar and as a very nice consequence: have it sticking to the top of the page.


However ... due to requirements of this specific customer, all pages use Page Template Minimal (No Navigation). And this makes my page look like:


I want to stretch this over the entire page, of course. To do so, I needed some minor CSS customisation. I decided to do this on page level on the Inline CSS attribute of page 9:


The t_Body_title is exact the DIV that makes this region align to the right. This I "discovered" by inspecting the page. By deselecting (at runtime) the part highlighted in red (see screenshot below), the region jumps to the left ....


So this bit is now overwritten by the custom CSS on page level. Setting width: 100% of course makes it render over the entire width of the page.

The other regions

All other regions are displayed in the Content Body. And the Region Display Selector is set to 'Yes' in the Advanced tab of the pages' attributes.


And that's it. I'm pretty happy with this result and I believe I will use this approach more often in the future. 

And what if you actually use Breadcrumbs?

Well, then sorry ... it won't work!

Naaahhh ... just joking!
If you have a real Breadcrumb region in the Breadcrumb Bar, you can simply add your own region (in my example the Candidate ... region) into the Breadcrumb Bar, just below the breadcrumb region and it will work just fine.


Happy to share ....


Tuesday, April 18, 2017

Set SQL format

set sqlformat

This is a quick note for something I have to lookup time and again.

And it's such a great feature, that every developer should know ... the set sqlformat statement!

With set sqlformat statement you can actually influence the result of your query. Or at least the format of that result.
E.g. you can make the output look like a CSV file. Or even better like a JSON file.
But also ... like an insert statement. So easy to quickly copy a line in a table. Of course, you have to take care of the unique constraints yourself. But hey, if you quickly want to create (duplicate) some data. This is a very nice way of doing it!

Query

select *
  from emp
 where empno = 7839
 ;

Normal result

     EMPNO ENAME      JOB              MGR HIREDATE          SAL       COMM
---------- ---------- --------- ---------- ---------- ---------- ----------
    DEPTNO
----------
      7839 KING       PRESIDENT            17/11/1981       5000          
        10

Example 1

set sqlformat csv

Result 1

"EMPNO","ENAME","JOB","MGR","HIREDATE","SAL","COMM","DEPTNO"
7839,"KING","PRESIDENT",,17/11/1981,5000,,10

Example 2

set sqlformat json

Result 2

{"items":[
{"empno":7839,"ename":"KING","job":"PRESIDENT","hiredate":"17/11/1981","sal":5000,"deptno":10}]}

Example 3

set sqlformat insert

Result 3

REM INSERTING into emp
SET DEFINE OFF;
Insert into "emp" (EMPNO,ENAME,JOB,MGR,HIREDATE,SAL,COMM,DEPTNO) values ('7839','KING','PRESIDENT',null,to_date('17/11/1981','DD/MM/YYYY'),'5000',null,'10');

Available formats (as far as I know now)

  • csv
  • html
  • xml
  • json
  • insert – INSERT statements
  • loader – sql*loader
  • fixed
  • default – obviously this clears the format and sets it back to the "normal" format (see "Normal result")

Happy to share

Tuesday, December 13, 2016

Use one lookup table as base for all the LOV's

One lookup table as base for all the LOV's

Lists of Values ... it's probably one of the most often used components in APEX development. And actually in any kind of software development, I suppose.

Having an E-Business Suite background, I got the idea to steal one of the better ideas the EBS has and that's dealing with LOV's, "lookups" they're called.
All those lookups are based in one single table, operating over a lookup-type. In EBS a set of views is defined and those views are used depending on the EBS domain.
I choose not to go that far and kept it to one single table.

A second idea stolen from EBS is the dependancy between lookups. Also that idea I simplified a bit and I kept it to one level. Meaning a set of values can differ from the chosen value of another set.

Finally I used the idea behind the multi-lingual solution of the EBS. Though that is the one I simplified the most. Whereas in EBS you have a base table containing a code and an _TL table containing one line for each installed language, in this solution I simply maintain all languages in the same base table. All records have a language code and in most systems there are two, max three different languages.

Table structure


Let me run you first through some background info. This solution was built for an extension on the EBS, in the HR modules. But the customer has a whole different database setup for the APEX extensions, so we're not directly using the EBS itself. A daily routine copies some basic EBS data over to the "APEX db" using a database link.  The solution itself and the architecture has pro's and con's, but I'm not writing about that now, let's keep focus on the LOV's.

EBS uses a lot of LOV's and of course we want to offer the user the exact same LOV's in the APEX applications.
So the table EBS_GENERIC_LOVS was created.
  • LOV_TYPE: As explained in the introduction, the column LOV_TYPE refers to the type of LOV in EBS. It's basically the grouping name of the LOV;
  • LOV_CODE: that's the code used for the value itself. A code is unique within a type;
  • MEANING: is in fact the display value that goes with the LOV_CODE;
  • DEPENDANT_LOVE_TYPE and DEPENDANT_LOVE_CODE: it's the DEPENDANT combination of type and code. This links the value with a value chosen in another LOV. This LOV must of course exist and on the APEX page it must be entered before this LOV;
  • ACTIVE_FLAG, VALID_FROM and VALID_TO: the combination of these columns make the value available or not in the LOV;
  • LANGUAGE: a two-letter code for the language, depending on the language chosen in the application, it will show the correct value of the LOV;
  • SEQUENCE: an optional way to fix the ordering sequence in the LOV.

Language option

In case you're not familiar with EBS and how languages are being used up there: EBS is always installed in English (code 'US'). Optionally one or more other languages are installed, e.g. Dutch (code 'NL'). It's just a side note, because it has nothing to do with the solution itself. But it explains why screenshots show weird data :-)

When a user logs on to the EBS, a language is picked. That displays all the screens in that language. Also the data seeded by Oracle will be shown in the correct language.
But when you enter data, let's say the names of all the departments of your organisation, you initially enter that in one language. As Oracle can't translate that (yet???) in the other languages by itself, by default the entered value gets copied over to all different languages installed. And the user is responsible to and translate the values manually.
An example makes it more clear:

Two languages are installed: US and NL. A person that sets up the different departments is logged on in Dutch (code NL).
This person enters "Verkoop" as name of the sales department. When the SAVE button is pressed, two records are being saved in the _TL table for departments:
  1. Name: 'Verkoop' - Language: 'NL'
  2. Name: 'Verkoop' - Language: 'US'
Now it's up to this person doing setup to go and change the second line to:
  • Name: 'Sales' - Language: 'US'
If this step is not performed, every place where the department name is shown, regardless what language is chosen at login, the name 'Verkoop' will popup.

Dependant lists of values

This is exactly the same as what is done in APEX via Cascading LOV's. But here the link exists already in the table.
En example: the salary of an employee is identified by the grade that is defined for the employee. Each grade is split up in different steps (spinal points). The combination of a grade and a step (on a specific moment in time) define the salary.
This means the step (which is referred to as spinal point in the EBS) is dependant on the grade.
So every LOV_CODE of the type 'PER_SPINAL_POINT' will contain 'PER_GRADES' as dependant_lov_type and a specific value in dependant_lov_code. And that code of course must be a valid code for the type 'PER_GRADES'.

The LOV in APEX

In APEX you still need to define the LOV's that belong to the specific page items.
But this is where you gain from this solution. Because all your LOV's will look the same. It's a simple query every time on the same table:


As you can imagine, the language is stored in the application item AI_LANGUAGE.
The columns description and meaning are often mixed in EBS, hence the NVL.

On every LOV_TYPE you can make an APEX LOV with this same query as base. The only thing different will be the where clause "lkp.lov_type = ".

The dependant LOV identifying the step will then look like this:


The result in APEX


You notice that although the application language is English, the content - in this example the names of the grades - is in Dutch. This is - as explained above - because in EBS the (manual) translation of the setup of the grades from Dutch to English was never done!

Because Step is depending (cascading) on the Grade, no value can be selected as long as the Grade hasn't been entered:


Once a grade is chosen, the dependant values in Step appear:


My conclusion

This solutions requires hardly no extra effort compared to the standard way of working.
I would say even less effort is required.
On top of that it is absolutely no stopper of any existing LOV already in the system.

But most important advantage: I described the link with EBS, but in general it can be used for any system you link with: exactly the same LOV's on the base system can be re-used in the APEX application.

It should be clear that everything described above can also be done via normal LOV behaviour in APEX. But I truly believe that you will limit maintenance cost dramatically by using one single base table for all the LOV's!


Happy to share ....


Tuesday, December 6, 2016

Using JSON and Javascript to show or hide list menu entries

Using JSON and Javascript to show or hide list menu entries 

Here's a post that is the result of great team work. Proving once again a point that I believe in very strongly: so few great ideas come from the hand of just one person!

A colleague and I started brainstorming on this for a very specific need for a very specific customer. But our solution is really very flexible and re-usable for many other things! Read on, believe me, it get's interesting! ;-)

The technology

We're gonna use PL/SQL (of course), Javascript, APEX API's and a JSON structure.

What's our goal

We were looking for a flexible way to show or hide menu list entries. 

You see we have a dashboard alike application that does nothing else than kicking off other APEX applications. The complete set of applications is kind of a "Suite".
Now depending on which role you have in the organization you can see different list entries.
All very much feasible with the normal conditions of course.

But this "Suite" is growing and with the team working hard, a lot of applications are being build as others are ready to go in the Test or Acceptance cycle, others are ready for Production. But others are still "under construction" and aren't allowed to be installed in other environments.

The solution in words

So we wanted to have this double validation in a flexible way. The information - or setup if you want - needed to stay in the APEX application. We wanted to avoid storing it in a custom table, because then we would have the extra difficulty to maintain this "setup table" on al the different environments.

So we had a good close look at the application.
We also had a good close look at the List Entry screen in APEX and finally we browsed through the APEX API's.

The solution in technology

Administrator stuff

All the following points are to be done once, by an administrator. So of course, that part of the APEX application Suite is protected and only administrators can do it!


We're using a table to store the environment information. This will be a pretty stable situation.
In my neck of the woods, we often talk about the "OTAP" street. In the English speaking world, I think only the "O" needs explanation. 
The "O" stands for "Ontwikkeling", which is Dutch for "Developtment".
"T" = "Test";
"A" = "Acceptance";
"P" = "Production".

Our table looks like:


And a really simple APEX page to handle this setup information:


Then it gets a little more complicated. Or is that the wrong word? It should probably sound nicer when I say "interesting" ...

This overview page shows all the lists that we have identified:


And this information is fetched from the APEX repository. Have a look at the query behind the scenes.

We're gathering all the lists on the pages we've identified in the different applications.


And here it's important to picture that each and every menu groups some (Self Service) tasks to which you either have access to or you don't ...

Let's take a closer look at one single Menu, the one for "My Employees".
This is typically a menu that only is visible for managers ....


And now we land in a page that needs some explanation, I believe:


It's probably (hopefully) still clear that this is an overview of all the list entries of that List called "mijn_emp_en".
So we show the list entry name. Followed by the check icon if there is an APEX condition entered for that entry. In our example almost all entries have a condition.

Next are the four environments: O - T - A - P. It's simple enough: 'Yes' means that the list entry is to be displayed. Or in other words: this functionality is installed in that environment.
Because it's not sure yet it can be displayed according to the rules of role management!
That's the last column: "Enabled for these role codes".

Our roles are coded in a table as well. E.g. 'ADM' for 'Administrator' and 'DIR' for 'Director' ....

If you have a look at the screenshot above, you see e.g. that the functionality 'Leave cards' is only available on Development ('O'). And (e.g.) the 'Team occupation overview' is also available on 'T'. Nothing has been installed on 'A' or 'P' yet.
And all entries are allowed for that set of roles identiefied in the last column.


Now it's time to zoom in on one entry. And in the screenshot I changed the list of roles, to make it more clear:


First the condition in APEX is shown. Because this condition will also be checked upon. But in our exercise it was the idea to replace those conditions by this flexible mechanism.
We then chose the environments where the application can be used (remember - almost - every list entry navigates to another APEX application).

The functionality may not be shown for the roles 'CTRL' and 'EMP'. All other roles will be able to access it.


Behind the scenes, beyong the obvious

I told you, we're not storing the setup in a table, but directly in the APEX application.
The Apply changes button kicks off the process 'Save values for Envs and Roles'.
Here the two types of validations are seperated. Because we store them in the attribute values of the entry itself. 

This code was a bit of work. Figuring it all out. Therefor step by step:
  1. Gather all current values.
    A very important step, because we learned the API overwrites everything with null values if you pass nothing.
  2. A JSON structure is used.
    Simple: we needed "a" structure and we believe that JSON was the best way.
    One JSON for ENTRY_ATTRIBUTE_09 to store the environment Yes/No information.
    Another JSON for ENTRY_ATTRIBUTE10 to store the role code information.
    Here we used the apex_json package.
  3. Now we need to set the API mode to 'REPLACE'.
    To make sure we can put the mode back to the original value, first the original value is stored:
    l_old_api_mode := wwv_flow_api.g_mode;
    wwv_flow_api.g_mode := 'REPLACE';
  4. Next the API. It's is called: wwv_flow_api.create_list_entry
    See screenshot below, where most important parameters are highlighted.
  5. Set API mode back to it's original, which is reversing what we did in step 3.


Results in the List in APEX

To see the results, have a look at the Shared Component List


And we pick the "Team occupation overview"


And just to show the condition, always returning "false", obviously a test case ...


But the real interesting stuff is in the attributes:


Now this information is in this application's definition. And it can be moved to any other environment. It's not important that the functionality behind this list entry is in fact installed on that environment. Because it will only come into play when the environment specific setting is set to 'Yes'.


And at run time

Now we have all the setup available. We have all the information in place to decide what to display for whom and what not to display at all.

So let me first show two screenshots of the same application.
First one is the application seen by the eyes of an administrator (remember the 'ADM' as role).
Second one is by the eyes of a supervisor (remember the 'SV' as role).

Administrator


Supervisor


To make this happen, we needed a Post-Rendering process on the page showing all the List regions:


It looks like a very simple process. But the complexity is hidden in the PL/SQL:


The PL/SQL code is too large to display here, but upon request (I guess) we're willing to share also that. However in short, this is what it does:


  1. Initialise some code:
  2. Check the DB we're living on:
  3. Loop through all regions, as some lists are defined in different applications, the query got quite large, but we're joining apex_application_page_regions and apex_application_list_entries
  4. Read both JSONs and look for the corresponding Y/N values
  5. We then check if we're at the end of a list, because if a list is completely empty, we also remove the region so you don't get a list region with no list entries in it!
  6. Check on the environment, because when the environment says no, we don't need to check the role condition, do we?
  7. Same check for the role
  8. Construct the javascript to remove the disabled list entries

Now, all this is executed as a JAVA script after having rendered the page. This means that an APEX condition is on a higher level than this validation. Meaning that if the APEX condition e.g. says 'Never' ... it really will be 'Never' and it will not display, no matter what comes out this Post-Rendering process.


Here we are ... a long explanation, I know. I tried several times to make it shorter, but then I believe the it was not possible to follow the route anymore. Well, I hope now it was possible to follow what we did. If it wasn't and you want to know more, I'm sure you'll find a way to get in thouch with me.

Also I want to thank again my colleague and partner in crime, Joost, for making this all possible!

Remarkable final thouch: we have some pretty good DJ's in Belgium: thanks Regi and Dimitri Vegas & Like Mike for the inspiring music while writing this all down .....


Happy to share ...